Repair Workshop Steering, bearings and cranks Crank and bracket

Repair · Steering, bearings and cranks

Remove a Cottered Crank and Rebuild the Bottom Bracket

How a handbook of 1913 took a cottered crank off, took the bottom bracket apart and put it together again, with a second handbook of 1916 beside it for the checks: knock the cotter out, clean and examine the bearing, set the cups and cotter the cranks home. Every instruction is from the Ebykr archive; the drawings are Ebykr’s own.

DifficultyModerateTwo hammers, a pin spanner and care (Ebykr’s estimate)
StepsSevenFrom Henry, 1913, and Cassell, 1916
You will needFour tools, four materialsThe list, in the sources’ terms
SourceHenry 1913 and Cassell 1916Records 94435 and 94257

Before you start

This page shows how period sources took a cottered crank off and rebuilt a bottom bracket, step by step, in their own words and figures. It does not test or guarantee any repair. The cranks and the bracket are safety parts, and the cotter work rests mainly on one book, Henry’s, with Cassell beside it only for the checks. If you are not sure, ask a bicycle shop to do the job or to check it before you ride.

On this page The drawing Tools and parts The steps in words What goes wrong Another way Sources

Escape also leaves this view.
    Drawing key
    Workbench view: one step at a time in large type, for a phone or tablet on the bench.

    Tools and parts

    In the sources’ own terms; every item is named in them. Tick each one off as you gather it.

    Tools

    • A pin spanner For the cups (Henry)
    • Two hammers One held under the crank and one to knock or drive the cotter (Henry)
    • A cotter pin extractor If you have one: Henry says to use it
    • A rag and a vessel The rag for the bracket, the vessel to soak the balls in (Henry)

    Neither book names the spanner for a bracket lock ring; Holdsworth listed the No. 712 for bracket lock rings (see Adjust the Head Races).

    Parts and materials

    • Paraffin To clean the bracket and soak the balls (Henry)
    • Vaseline In the cups, to hold the balls (Henry)
    • Good oil After cleaning (Cassell)
    • New balls or a cup, if one is bad Balls the same diameter as the old (Cassell)

    The steps in words

    The whole job, readable and printable without the drawing. Each step says what it rests on, and can take you back up to its drawing.

    Take the nut off and knock the cotter out

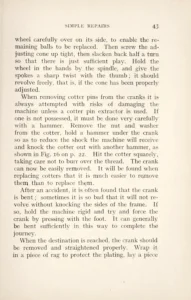
    Take the nut and washer off the cotter. Hold a hammer under the crank, so that the machine takes less of the shock, and knock the cotter out with another hammer. Hit it squarely, taking care not to burr over the thread. Henry warns that pulling cotter pins is always risky for the machine unless a cotter pin extractor is used; without one, it must be done very carefully with a hammer. The crank can then be taken off easily.

    What this step rests on
    • exact The nut and washer off; a hammer held under the crank to lessen the shock; the cotter knocked out with another hammer, hit squarely so as not to burr the thread; an extractor if there is one; the crank then easy to remove: Henry 1913, page 43.
    • not stated Which way the cotter goes out, how an extractor works and how to free a crank that sticks: neither book says. The drawing of the strike is schematic.

    Take the cranks off, unscrew the cups and take the spindle out

    The cranks must come off first, each with its cotter knocked out the same way. Then unscrew the cups with a pin spanner and take the spindle out of the bracket.

    What this step rests on
    • exact The cranks off first; the two cotters out; the cups unscrewed with a pin spanner; the spindle taken out: Henry 1913, page 45.
    • not stated Which cup comes out first, which way it turns, and whether the chain wheel comes off with its crank: Henry does not say. Cassell describes only a one-piece American axle (see Another way).

    Soak the balls and clean the bracket

    Soak the balls in a vessel of paraffin to clean them. Clean the bracket by passing a rag dipped in paraffin backwards and forwards through it. Wipe every part quite clean before it is looked at.

    What this step rests on

    Examine the balls and the cups

    Look at every ball and at the cups and the bracket discs. Replace a chipped, rough or broken ball with a new one of the same diameter, and a bad or unevenly worn cup or disc with a new one. Cassell suggests turning the fixed, chain-wheel side half a revolution in the bracket when you put it back, which brings a fresh part of the disc into the place that takes the wear. If the spindle is out, test it for truth: a bearing can never be properly adjusted to run well on a bent axle.

    What this step rests on
    • exact A chipped, rough or broken ball replaced by one of the same diameter; a bad or unevenly worn cone, cup or bracket disc replaced; the bottom-bracket discs altered in position by turning the fixed, chain-wheel side half a revolution in the bracket, so that a fresh part of the disc takes the wear: Cassell 1916, page 28.
    • exact The bracket axle tested for truth when a bearing is taken to pieces: Cassell 1916, page 17.
    • not stated Henry examines the balls and cones of a hub, not those of a bracket, so this step rests on Cassell alone. Neither says what a worn cup looks like.

    Grease the cups, put the balls in and slip the spindle through

    Smear the inside of the cup and screw it into the bracket on the chain-wheel side. Put the right number of balls in the cup, and slip the spindle through the bracket from the opposite side, the longer end, the one for the chain wheel, going through first. Smear the inside of the other cup with vaseline and put the remaining balls in.

    What this step rests on
    • exact The cup smeared and screwed in on the chain-wheel side; the correct number of balls; the spindle slipped through from the opposite side, the longer end first; the other cup smeared with vaseline and the remaining balls put in: Henry 1913, pages 19 and 20.
    • not stated How many balls a bracket takes: Henry says only the correct number.

    Set the left cup, and oil

    Hold the spindle on the far side and screw in the left cup, so that the balls are free and yet there is no shake. Twist the spindle to see that it turns freely. Cassell sets a bracket the same way as a wheel: tighten it rather too tight, then slack it back a trifle until it turns with no perceptible side shake, and do it before the chain goes back on. Oil every bearing with a good oil.

    What this step rests on
    • exact The left cup screwed in so that the balls are free and yet no shake; the spindle twisted to see that it revolves freely: Henry 1913, pages 19 and 20.
    • exact The bracket tightened rather too tight and slackened a trifle until there is no perceptible side shake, before the chain is replaced: Cassell 1916, page 27. All bearings lubricated with good oil after cleaning: Cassell 1916, page 28.
    • not stated How far to slacken the cup: Cassell gives a trifle here and a quarter to a half turn for a cone (Cassell 1916, pages 28 and 29); Henry gives none for a bracket.

    Fit the cranks and drive the cotters home

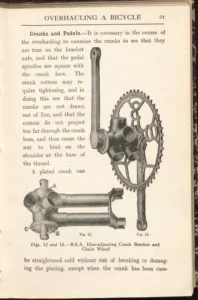
    The flat side of a crank must face outward. Twist the crank on to the left end of the spindle, and the chain wheel on to the right, until both are flush with the ends of the spindle. The flat side of each cotter must face the flat groove in the spindle: turn the crank round until the groove shows through the cotter hole. Push the cotters in from opposite directions, one pointing up and the other down. Hold a hammer under the crank and drive the cotter home smartly with another. Fit the washer and screw on the nut. Do not leave a cotter half out and expect the nut to draw it into place. The cranks must fit tightly to the spindle. Cassell adds that a cotter must not project so far through the crank boss that the nut binds on the shoulder at the base of its thread, and that tightening must not draw the cranks out of line.

    What this step rests on
    • exact The flat of the crank outward; the crank and the chain wheel on flush with the spindle ends; the flat of each cotter facing the flat groove; the cotters in opposite directions, one pointing up and one down; driven home smartly with a hammer held under the crank; the washer and the nut; not left half out; the cranks fitting tightly: Henry 1913, pages 22 and 23.
    • exact The cotters not projecting too far through the crank boss, so that the nut does not bind on the shoulder at the base of the thread; the cranks not drawn out of line: Cassell 1916, page 21.
    • not stated How hard to drive a cotter or how tight to turn the nut: neither book says more than smartly and tight.

    What goes wrong

    Each of these is a source’s own warning, except the last, which is what the sources leave out.

    • Damage to the machine Knocking a cotter out with no hammer held under the crank, or without care, risks damaging the machine (Henry).
    • A burred thread Hit the cotter squarely, taking care not to burr over the thread (Henry).
    • A cotter left half out The nut will not draw it into place (Henry).
    • A nut that binds A cotter that projects too far through the crank boss makes the nut bind on the shoulder at the base of the thread (Cassell).
    • Cranks drawn out of line Tightening a cotter must not draw the crank out of line (Cassell).
    • A bent axle A bearing can never be properly adjusted to run well on one (Cassell).
    • Shake, or a bracket that binds The left cup is set so that the balls are free and yet there is no shake (Henry).

    A crank that sticks Neither book says how to free a crank that will not come, how a cotter pin extractor works, which way a cotter goes out, or how hard to drive or tighten one beyond smartly and tight.

    Another way

    A one-piece axle

    Cassell says that on an American cycle one crank and the axle are forged in one: take off the other crank and all the cones, and the axle comes out of the bracket case. Cassell 1916, page 18.

    A bent crank

    After an accident a crank may be bent: Henry says it can be forced straight with the foot for the journey home, then taken off, wrapped in a rag to protect the plating, laid under a piece of wood and hit with a heavy hammer, testing with a straight-edge after each blow (Henry 1913, pages 43 and 44). Cassell holds a plated crank in the vice between lead clamps and bends it straight with a twisting wrench with its jaws lined with sheet brass (Cassell 1916, pages 21 and 22). This page does not give either as a step.

    Sources

    Every record opens in the Ebykr archive. Each step above names the page it rests on.
    Record 94435, pages 19 to 23 and 43 to 46Peter Henry, Cycle Building and Repairing, 1913Knocking a cotter out, taking the bottom bracket apart, building it up again with the cups, balls and spindle, and fitting the cranks and cotters.
    Record 94257, pages 17 to 22, 27, 28Cassell, Cycle Repairing and Adjusting, 1916 reprintExamining the cranks and cotters, the bracket examined and set, the bearing discs turned half a revolution, a bent crank straightened.
    Record 78574, page 44Holdsworth 1967-68: toolsHub cone spanners, and the No. 712 spanner for head lock nuts and bracket lock rings.

    Henry’s book is the Library of Congress copy on the Internet Archive; Cassell’s is DTU Library’s copy (Danmarks Tekniske Kulturarv). Both are public domain, and the archive carries their page images in full with Ebykr’s own reading of the print. This page puts the sources in Ebykr’s own words and quotes nothing at length.

    Exact, derived and schematic

    • exactThe nut and washer off, a hammer under the crank, the cotter knocked out squarely; the cranks off, the cups out with a pin spanner, the spindle out; the balls soaked and the bracket wiped with paraffin; a damaged ball or cup replaced, the fixed side turned half a revolution; the cup smeared, the right number of balls in, the spindle slipped through longer end first; the left cup set so that the balls are free and yet no shake; the cranks and chain wheel on flush, the flat cotter faces to the flat grooves, one cotter up and one down, driven home smartly; the nut; good oil.
    • schematicThe drawing: the bracket, cranks and bench, the number of balls drawn, which way a cotter goes out, and all motion. Ebykr’s own drawing.
    • not statedFreeing a stuck crank, the extractor, which cup comes out first, how hard to drive or tighten a cotter, and a worn cup by eye. The removal and the fitting of the cotters are Henry’s alone.

    The Ebykr Digest

    A monthly letter on classic lightweight bicycles

    New articles, timelines, catalog finds and registry activity — assembled from the archive once a month. Your address is never shared.

    Double opt-in. One email per month. Unsubscribe at any time with one click.