About Ebykr
Ebykr celebrates classic and vintage lightweight bicycles through provocative imagery and opinion. Ride along with us.
About Ebykr
Ebykr celebrates classic and vintage lightweight bicycles through provocative imagery and opinion. Ride along with us.

How a 1961 booklet tested a hub’s adjustment with nothing but the weight of the tire valve, and how the cone is then set: free to turn, with no side play. The test and the rule are the period’s, from the Ebykr archive; the drawings are Ebykr’s own.
This page shows how period sources checked and set a hub, step by step, in their own words and figures. It does not test or guarantee any repair. A wheel is a safety part: if you are not sure of the adjustment, ask a bicycle shop to check it before you ride.
On this page The drawing Tools and parts The steps in words What goes wrong Sources
Your system asks for reduced motion, so each step is a still drawing. Play moves from still to still.
In the sources’ own terms; every item is named in them. Tick each one off as you gather it.
The sources name no other tool.
The whole job, readable and printable without the drawing. Each step says what it rests on, and can take you back up to its drawing.
Hold the frame so that the wheel is clear of the ground and free to turn. The booklet checks both hubs this way, front and rear, once a month.
Turn the wheel until the tire valve is level with the hub, and let go. When the cones are right, the weight of the valve alone moves the wheel, slowly and easily, until the valve hangs at the bottom. If the wheel will not move at all, the cones are too tight.
Hold the rim and rock it from side to side. There should be no side play at the rim. Rudge’s rule for every bearing says the same thing another way: it should run free, with very little shake.
One cone of the hub is the adjustable one, held by a locknut outside it. On the front wheel the booklet puts it on the left-hand side, as seen from the riding position. Schwinn advertised hubs with a separate adjusting cone locknut.
Release the locknut. Turn the cone in a little if the rim had side play, or out a little if the wheel would not turn. Hold the cone where it is and tighten the locknut against it. Thin spanners were sold for the job: Holdsworth listed a pair of hub cone spanners for quick-release and solid hubs.
Repeat the valve test and feel again for side play. Adjust until both are right at once: the valve moves the wheel slowly and easily, and the rim has no side play.
A clicking noise in a bearing means a broken ball or a worn cone, Rudge warned: renew it at once to save more damage. Oil the hubs once a month, the booklet says. Rudge gives all bearings a little oil about every 100 miles, of good grade and not too much: too much draws dirt and grit into the bearing.
Each of these is a source’s own warning, except the last, which is what the sources leave out.
A hub to take apart No period text in the archive takes a hub apart or says how to renew its balls. This page does not either.
Every record opens in the Ebykr archive. Each step above names the page it rests on.
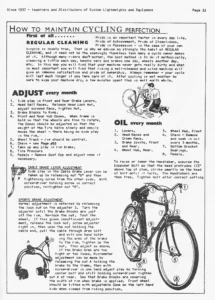
The Cyclo-pedia was the catalog of Gene Portuesi, an importer of lightweights in Detroit. This page puts its method in Ebykr’s own words and quotes nothing at length.
The Ebykr Digest
New articles, timelines, catalog finds and registry activity — assembled from the archive once a month. Your address is never shared.
Double opt-in. One email per month. Unsubscribe at any time with one click.